搜索集群迁移时,源端能成功创建快照,并不等于目标端能够恢复。本文从 S3 仓库与权限配置开始,记录 Elasticsearch 7.10.2、Easysearch 1.8.2、OpenSearch 2.13 等版本之间的恢复测试和报错。结论对应文中测试版本,用于理解迁移前需要验证哪些条件。
本文属于「Easysearch 实战 · 快照兼容测试」。查看系列目录 · Easysearch 快照备份与恢复的完整流程 。
启动集群 Easysearch 先检查宿主机的 vm.max_map_count。下面是本次测试使用的设置:
1 sysctl -w vm.max_map_count=262144
vm.max_map_count 是一个 Linux 内核参数,用于控制单个进程可以拥有的最大内存映射区域(VMA,Virtual Memory Areas)的数量。内存映射区域是指通过内存映射文件或匿名内存映射创建的虚拟内存区域。
这个参数在一些应用程序中非常重要,尤其是那些需要大量内存映射的应用程序,比如 Elasticsearch。Elasticsearch 使用内存映射文件来索引和搜索数据,这可能需要大量的内存映射区域。如果 vm.max_map_count 设置得太低,Elasticsearch 可能无法正常工作,并会出现错误信息。
调整 vm.max_map_count 参数的一些常见原因:
支持大型数据集 :vm.max_map_count 可以确保这些应用程序有足够的内存映射区域来处理数据。
防止内存错误 :vm.max_map_count 设置得太低,当应用程序尝试创建超过限制的内存映射时,会出现错误,导致应用程序崩溃或无法正常工作。
优化性能 :vm.max_map_count 可以优化应用程序的性能,确保内存映射操作顺利进行。
检查当前的 vm.max_map_count 值:
或者查看 /proc/sys/vm/max_map_count 文件:
1 cat /proc/sys/vm/max_map_count
本文的 Elasticsearch 7.10.2 环境使用至少 262144 的设置;其他版本和应用应对照各自的要求。
Easysearch 具体安装步骤见INFINI Easysearch 尝鲜 Hands on
Amazon OpenSearch 使用 Amazon Web Services 控制台进行创建。
Elasticsearch 使用如下 docker compose 部署一个三节点的 ES 集群:
1
2
3
4
5
6
7
8
9
10
11
12
13
14
15
16
17
18
19
20
21
22
23
24
25
26
27
28
29
30
31
32
33
34
35
36
37
38
39
40
41
42
43
44
45
46
47
48
49
50
51
52
53
54
55
56
57
58
59
60
61
62
63
64
65
66
67
68
69
70
version: "2.2" services: es01: image: docker.elastic.co/elasticsearch/elasticsearch:7.10.2 container_name: es01 environment: - node.name=es01 - cluster.name=es-docker-cluster - discovery.seed_hosts=es02,es03 - cluster.initial_master_nodes=es01,es02,es03 - bootstrap.memory_lock=true - "ES_JAVA_OPTS=-Xms512m -Xmx512m" ulimits: memlock: soft: -1 hard: -1 volumes: - data01:/usr/share/elasticsearch/data ports: - 9200 :9200 networks: - elastic es02: image: docker.elastic.co/elasticsearch/elasticsearch:7.10.2 container_name: es02 environment: - node.name=es02 - cluster.name=es-docker-cluster - discovery.seed_hosts=es01,es03 - cluster.initial_master_nodes=es01,es02,es03 - bootstrap.memory_lock=true - "ES_JAVA_OPTS=-Xms512m -Xmx512m" ulimits: memlock: soft: -1 hard: -1 volumes: - data02:/usr/share/elasticsearch/data networks: - elastic es03: image: docker.elastic.co/elasticsearch/elasticsearch:7.10.2 container_name: es03 environment: - node.name=es03 - cluster.name=es-docker-cluster - discovery.seed_hosts=es01,es02 - cluster.initial_master_nodes=es01,es02,es03 - bootstrap.memory_lock=true - "ES_JAVA_OPTS=-Xms512m -Xmx512m" ulimits: memlock: soft: -1 hard: -1 volumes: - data03:/usr/share/elasticsearch/data networks: - elastic volumes: data01: driver: local data02: driver: local data03: driver: local networks: elastic: driver: bridge
这份 Docker Compose 没有部署 Kibana,所以我使用 Console 接入 Elasticsearch 集群。
集群信息
快照还原的步骤 插件安装 本次测试选择把索引快照备份到 Amazon S3,所以需要使用 S3 repository plugin,这个插件添加了对使用 Amazon S3 作为快照/恢复存储库的支持。
本次测试的 Easysearch 和 Amazon OpenSearch Service 环境已经支持 S3 仓库,无需额外安装。自建 OpenSearch 时,需要另行检查 repository-s3 插件是否已安装。
对于自己部署的三节点 Elasticsearch 则需要进入每一个节点运行安装命令然后再重启集群,建议使用自动化运维工具来做这步,安装命令如下:
1 sudo bin/elasticsearch-plugin install repository-s3
如果不再需要这个插件,可以这样删除。
1 sudo bin/elasticsearch-plugin remove repository-s3
由于需要和 Amazon Web Services 打交道,所以我们需要设置 IAM 凭证,这个插件可以从 EC2 IAM instance profile,ECS task role 以及 EKS 的 Service account 读取相应的凭证。
Amazon OpenSearch Service 不开放底层节点的配置权限。这里新建 OpenSearchSnapshotRole,允许服务通过它访问 S3;注册仓库的调用者则需要有 iam:PassRole 权限,把这个角色传递给服务。
创建 OpenSearchSnapshotRole,策略如下:
1
2
3
4
5
6
7
8
9
10
11
12
13
14
15
16
17
18
19
20
21
22
23
24
{ "Version" : "2012-10-17" , "Statement" : [ { "Action" : [ "s3:ListBucket" ] , "Effect" : "Allow" , "Resource" : [ "arn:aws:s3:::bucket-name" ] } , { "Action" : [ "s3:GetObject" , "s3:PutObject" , "s3:DeleteObject" ] , "Effect" : "Allow" , "Resource" : [ "arn:aws:s3:::bucket-name/*" ] } ] }
信任关系如下:
1
2
3
4
5
6
7
8
9
10
11
12
{ "Version" : "2012-10-17" , "Statement" : [ { "Effect" : "Allow" , "Principal" : { "Service" : "es.amazonaws.com" } , "Action" : "sts:AssumeRole" } ] }
然后在我们的 IAM user 上加上 PassRole 的权限,这样我们就可以把 OpenSearchSnapshotRole 传递给 OpenSearch 集群。
1
2
3
4
5
6
7
8
9
10
{ "Version" : "2012-10-17" , "Statement" : [ { "Effect" : "Allow" , "Action" : "iam:PassRole" , "Resource" : "arn:aws:iam::123456789012:role/OpenSearchSnapshotRole" } ] }
注册存储库 先在源集群注册 S3 仓库。下面是通用的仓库配置;Amazon OpenSearch Service 还需要后文中的 region、role_arn 和签名请求。
1
2
3
4
5
6
7
8
PUT /_snapshot/snapshot-repo-name { "type" : "s3" , "settings" : { "bucket" : "<bucket-name>" , "base_path" : "<bucket-prefix>" } }
在目标集群同样执行这个语句,为了防止覆盖源集群存储库的数据,将 “readonly”: true 添加到”settings” PUT 请求中,这样就只有一个集群具有对存储库的写入权限。
如果 Bucket 在中国区,那么还需要加上endpoint: https://s3 .< region >.amazonaws.com.cn 这样的参数。
1
2
3
4
5
6
7
8
9
PUT /_snapshot/snapshot-repo-name { "type" : "s3" , "settings" : { "bucket" : "<bucket-name>" , "base_path" : "<bucket-prefix>" , "readonly" : true } }
对于 Amazon OpenSearch Service,需要在配置中添加 role_arn,并用具备 iam:PassRole 和相应域访问权限的 IAM 身份,通过 SigV4 签名请求注册仓库。我这里使用 Postman 完成签名。仓库注册成功后,再用具有快照操作权限的身份进行后续操作。
如果开启了细粒度访问控制,还需要把注册请求使用的 IAM 身份映射到 manage_snapshots 角色。只有 Dashboards 的用户名和密码不足以完成这次注册,步骤见 注册手动快照仓库 。
在 Postman 的 Auth 中填写 Access Key、Secret Key、AWS Region 和 Service Name(es)来做 SigV4 签名。如果使用临时凭证,也要带上 Session Token。
请求体如下:
1
2
3
4
5
6
7
8
9
10
{ "type" : "s3" , "settings" : { "bucket" : "<bucket-name>" , "base_path" : "<bucket-prefix>" , "region" : "<bucket-region>" , "readonly" : true , "role_arn" : "arn:aws:iam::123456789012:role/OpenSearchSnapshotRole" } }
查看仓库与快照 查看所有注册的存储库 :GET _snapshot:这个命令返回所有已注册的快照存储库列表及其基本信息。1 2 3 4 5 6 7 8 9 { "es_repository" : { "type" : "s3" , "settings" : { "bucket" : "your-s3-bucket-name" , "region" : "your-s3-bucket-region" } } }
查看特定存储库的详细信息 :GET _snapshot/es_repository:这个命令返回名为es_repository的存储库的详细配置信息,包括存储桶名称、区域和其他设置。1 GET _snapshot/es_repository
1
2
3
4
5
6
7
8
9
{ "es_repository" : { "type" : "s3" , "settings" : { "bucket" : "your-s3-bucket-name" , "region" : "your-s3-bucket-region" } } }
查看特定存储库中的快照 :GET _cat/snapshots/es_repository?v:这个命令返回es_repository存储库中的所有快照及其详细信息,包括快照 ID、状态、开始时间、结束时间、持续时间、包含的索引数量、成功和失败的分片数量等。1 GET _cat/snapshots/es_repository?v
1 2 3 id status start_epoch start_time end_epoch end_time duration indices successful_shards failed_shards total_shardssnapshot_1 SUCCESS 1628884800 08:00:00 1628888400 09:00:00 1h 3 10 0 10 snapshot_2 SUCCESS 1628971200 08:00:00 1628974800 09:00:00 1h 3 10 0 10
创建索引快照 1 2 3 4 5 PUT _snapshot/my_repository/my_snapshot { "indices" : "my-index,logs-my_app-default" }
根据快照的大小不同,完成快照可能需要一些时间。默认情况下,create snapshot API 只会异步启动快照过程,该过程在后台运行。要更改为同步调用,可以将 wait_for_completion 查询参数设置为 true。
1 PUT _snapshot/my_repository/my_snapshot?wait_for_completion=true
要查看当前正在运行的快照,可以使用带有 _current 路径参数的 get snapshot API。
1 GET _snapshot/my_repository/_current
如果要获取参与当前运行快照的每个分片的完整详细信息,可以使用 get snapshot status API。
成功创建快照之后,就可以在 S3 上看到备份的数据块文件,这个是正确的快照层级结构:
这里还要检查源端与目标端的 base_path 是否一致。我当时怀疑路径中的斜杠与跨集群恢复失败有关,但没有单独验证这个原因。下面的错误只能确认:目标端要读取的 S3 对象不存在,不能仅凭它认定斜杠就是根因。
在 OpenSearch 中恢复 Elasticsearch 快照时,报错如下:
1 2 3 4 5 6 7 8 9 10 11 12 13 14 15 16 17 { "error" : { "root_cause" : [ { "type" : "snapshot_missing_exception" , "reason" : "[easy_repository:2/-jOQ0oucQDGF3hJMNz-vKQ] is missing" } ] , "type" : "snapshot_missing_exception" , "reason" : "[easy_repository:2/-jOQ0oucQDGF3hJMNz-vKQ] is missing" , "caused_by" : { "type" : "no_such_file_exception" , "reason" : "Blob object [11111/indices/7fv2zAi4Rt203JfsczUrBg/meta-YGnzxZABRBxW-2vqcmci.dat] not found: The specified key does not exist. (Service: S3, Status Code: 404, Request ID: R71DDHX4XXM0434T, Extended Request ID: d9M/HWvPvMFdPhB6KX+wYCW3ZFqeFo9EoscWPkulOXWa+TnovAE5PlemtuVzKXjlC+rrgskXAus=)" } } , "status" : 404 }
恢复索引快照 1 2 3 4 POST _snapshot/my_repository/my_snapshot_2099.05.06/_restore { "indices": "my-index,logs-my_app-default" }
各个集群的还原 Elasticsearch 7.10.2 的快照可以还原到 Easysearch 和 Amazon OpenSearch
从 Easysearch 1.8.2 还原到 Elasticsearch 7.10.2 报错如下:
1 2 3 4 5 6 7 8 9 10 11 12 13 14 15 16 17 { "error" : { "root_cause" : [ { "type" : "snapshot_restore_exception" , "reason" : "[s3_repository:1/a2qV4NYIReqvgW6BX_nxxw] cannot restore index [my_indexs] because it cannot be upgraded" } ] , "type" : "snapshot_restore_exception" , "reason" : "[s3_repository:1/a2qV4NYIReqvgW6BX_nxxw] cannot restore index [my_indexs] because it cannot be upgraded" , "caused_by" : { "type" : "illegal_state_exception" , "reason" : "The index [[my_indexs/ALlTCIr0RJqtP06ouQmf0g]] was created with version [1.8.2] but the minimum compatible version is [6.0.0-beta1]. It should be re-indexed in Elasticsearch 6.x before upgrading to 7.10.2." } } , "status" : 500 }
从 Amazon OpenSearch 2.1.3 还原到 Elasticsearch 7.10.2 报错如下(无论是否开启兼容模式): 1 2 3 4 5 6 7 8 9 10 11 12 13 { "error" : { "root_cause" : [ { "type" : "snapshot_restore_exception" , "reason" : "[aos:2/D-oyYSscSdCbZFcmPZa_yg] the snapshot was created with Elasticsearch version [36.34.78-beta2] which is higher than the version of this node [7.10.2]" } ] , "type" : "snapshot_restore_exception" , "reason" : "[aos:2/D-oyYSscSdCbZFcmPZa_yg] the snapshot was created with Elasticsearch version [36.34.78-beta2] which is higher than the version of this node [7.10.2]" } , "status" : 500 }
从 Easysearch 1.8.2 还原到 Amazon OpenSearch2.13 报错如下(无论是否开启兼容模式): 1 2 3 4 5 6 7 8 9 10 11 12 13 14 15 16 17 { "error" : { "root_cause" : [ { "type" : "snapshot_restore_exception" , "reason" : "[easy_repository:2/LE18AWHlRJu9rpz9BJatUQ] cannot restore index [my_indexs] because it cannot be upgraded" } ] , "type" : "snapshot_restore_exception" , "reason" : "[easy_repository:2/LE18AWHlRJu9rpz9BJatUQ] cannot restore index [my_indexs] because it cannot be upgraded" , "caused_by" : { "type" : "illegal_state_exception" , "reason" : "The index [[my_indexs/VHOo7yfDTRa48uhQvquFzQ]] was created with version [1.8.2] but the minimum compatible version is OpenSearch 1.0.0 (or Elasticsearch 7.0.0). It should be re-indexed in OpenSearch 1.x (or Elasticsearch 7.x) before upgrading to 2.13.0." } } , "status" : 500 }
Amazon OpenSearch 还原到 Easysearch 同样失败 1 2 3 4 5 6 7 8 9 10 11 12 13 14 15 16 17 { "error" : { "root_cause" : [ { "type" : "snapshot_restore_exception" , "reason" : "[aoss:2/D-oyYSscSdCbZFcmPZa_yg] cannot restore index [aos] because it cannot be upgraded" } ] , "type" : "snapshot_restore_exception" , "reason" : "[aoss:2/D-oyYSscSdCbZFcmPZa_yg] cannot restore index [aos] because it cannot be upgraded" , "caused_by" : { "type" : "illegal_state_exception" , "reason" : "The index [[aos/864WjTAXQCaxJ829V5ktaw]] was created with version [36.34.78-beta2] but the minimum compatible version is [6.0.0]. It should be re-indexed in Easysearch 6.x before upgrading to 1.8.2." } } , "status" : 500 }
Elasticsearch8.14.3 迁移到 Amazon OpenSearch 或者 Elasticsearch 都是有这个报错: 1 2 3 4 5 6 7 8 9 10 11 12 13 14 15 16 17 18 19 20 21 { "error" : { "root_cause" : [ { "type" : "parsing_exception" , "reason" : "Failed to parse object: unknown field [uuid] found" , "line" : 1 , "col" : 25 } ] , "type" : "repository_exception" , "reason" : "[snap] Unexpected exception when loading repository data" , "caused_by" : { "type" : "parsing_exception" , "reason" : "Failed to parse object: unknown field [uuid] found" , "line" : 1 , "col" : 25 } } , "status" : 500 }
这里的报错表明,目标端无法解析源仓库元数据里的 uuid 字段。在执行 GET _cat/snapshots/snap?v、读取仓库信息时就已经失败,还没进入索引恢复阶段。我也尝试过在仓库配置里显式添加 uuid,但没有解决问题:
1 2 3 4 5 6 7 8 9 10 { "snapshot-repo-name" : { "type" : "s3" , "uuid" : "qlJ0uqErRmW6aww2Fyt4Fg" , "settings" : { "bucket" : "<bucket-name>" , "base_path" : "<bucket-prefix>" } } }
以下是兼容性对比,每行第一列代表源集群,第一行代表目标集群:
快照兼容对比 Easysearch 1.8.2 Elasticsearch 7.10.2 OpenSearch 2.13 Easysearch 1.8.2 兼容 不兼容 不兼容 Elasticsearch 7.10.2 兼容 兼容 兼容 OpenSearch 2.13 不兼容 不兼容 兼容
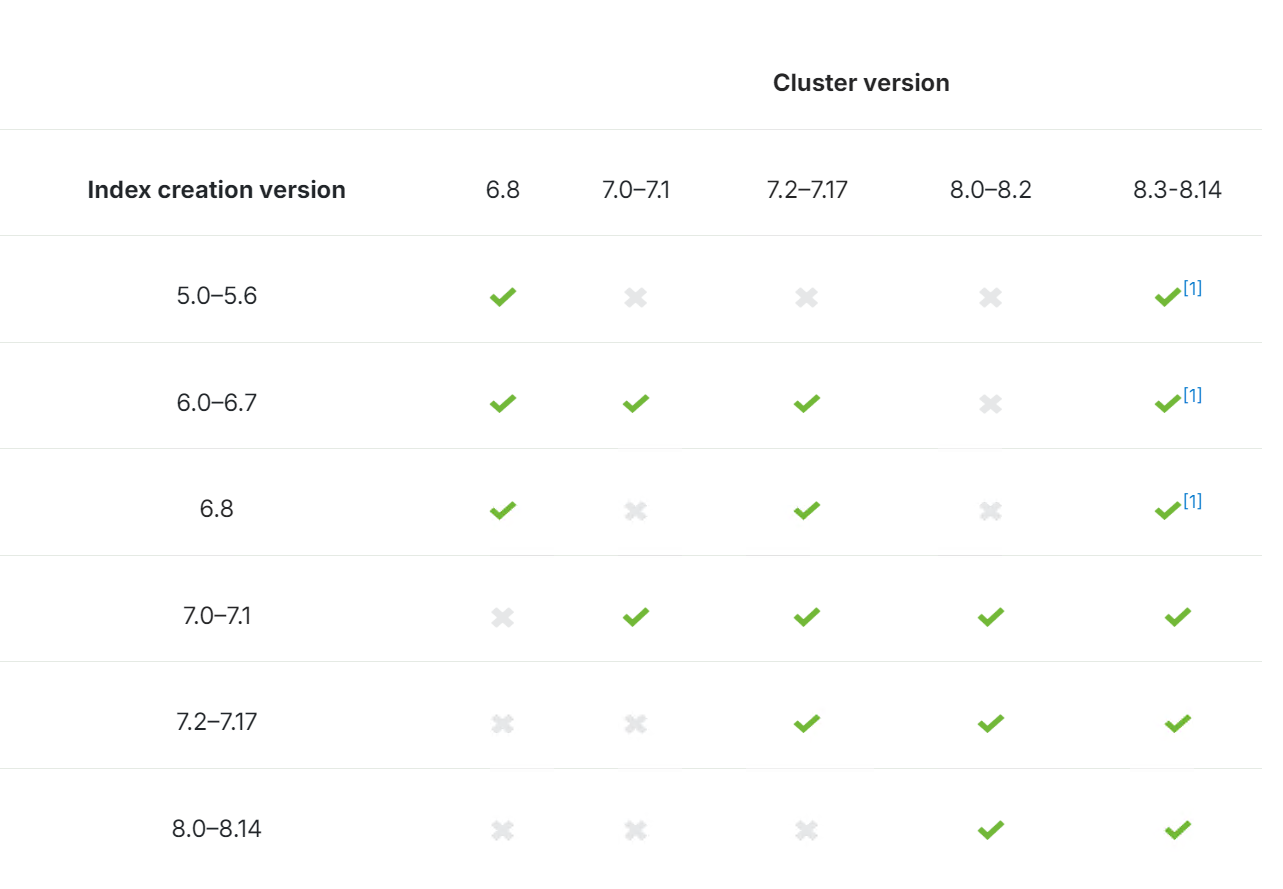
Elasticsearch 的兼容列表官方的列表如下:
参考文献 开始使用 Elastic Stack 和 Docker Compose:第 1 部分https://www.elastic.co/cn/blog/getting-started-with-the-elastic-stack-and-docker-compose
Docker Compose 部署多节点 Elasticsearch
https://www.elastic.co/guide/en/elasticsearch/reference/7.10/docker.html#docker-compose-file
repository-s3 教程
https://www.elastic.co/guide/en/elasticsearch/reference/8.14/repository-s3.html
https://www.elastic.co/guide/en/elasticsearch/plugins/7.10/repository-s3.html
snapshot-restore
https://www.elastic.co/guide/en/elasticsearch/reference/7.10/snapshot-restore.html
在亚马逊 OpenSearch 服务中创建索引快照
https://docs.amazonaws.cn/zh_cn/opensearch-service/latest/developerguide/managedomains-snapshots.html#managedomains-snapshot-restore
教程:迁移至 Amazon OpenSearch Service
https://docs.amazonaws.cn/zh_cn/opensearch-service/latest/developerguide/migration.html



 微信
微信 支付宝
支付宝